How to Use Telehealth Features on NuIQ

In this guide, we'll walk you through the steps to use telehealth features on NuIQ. This guide is applicable for both Mac and Windows users. We've also included troubleshooting tips to resolve common issues you might face.
Navigation Menu
Requirements
Before using the Telehealth feature, ensure you have:
- Desktop/Laptop
- Google Chrome Browser
Steps to Use Telehealth Features
Step 1: Start and Record Your Telehealth Session
- Access NUIQ Telehealth:
- Open Chrome and go to NUIQ Notes.
- Click on the "Telehealth" Button.

- Set Up Screen Sharing:
- When prompted, select the appropriate Chrome tab for your telehealth session.

- Grant Microphone Permissions:
- Click "Allow" to grant NUIQ access to your microphone.

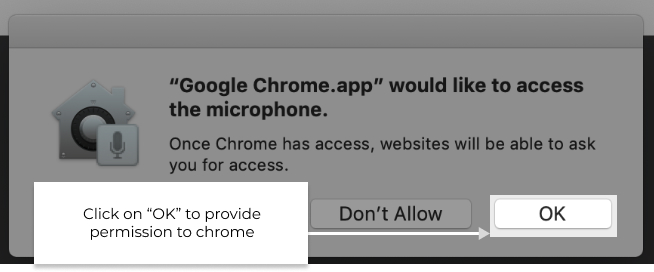
- Additional Instructions for Mac Users:
- If prompted a second time on a Mac, grant microphone permissions again.

- Begin Your Session:
- Your telehealth session will now start.

- End the Session and Process:
- Click "Stop" to end the session and begin automatic processing.
- Note: Recording automatically stops after 90 minutes for subscribers.

- Review Transcript:
- Once processing is complete, review the displayed transcript for any major inaccuracies.
- Optionally, add any additional clues and context not captured in the transcript.

Step 2: Generate, Review, and Finalize Notes
- Enter Session Details:
- Select the note type from the dropdown menu (e.g., DAP Note, Session Progress Note, SOAP Note).
- Enter the patient's name in the designated field.
- Specify the patient's pronouns in the "Pronouns" field.
- Click "Edit Forms" to show or hide additional forms.

- Generate Notes: Click the "Generate Notes" button to have NUIQ process your session and create structured notes.
- Review and Refine:
- Navigate between note formats and iterations.
- Edit notes as needed.
- Generate new iterations or try different formats.

- Finalize and Export: Choose the best version of your notes, make final adjustments, and copy them to your preferred EHR or EMR.

Troubleshooting Tips
Troubleshooting Tips
Check Browser Permissions (Mac and Windows)
Chrome
- Click the lock icon next to the website URL in the address bar.
- Make sure "Microphone" is set to "Allow".
- If it's not listed, go to
Settings > Privacy and Security > Site Settings > Microphoneand ensure the website is allowed to use the microphone.
Check System Preferences (Mac only)
- Go to
System Preferences > Security & Privacy > Privacy > Microphone. - Make sure Chrome is checked to allow access to the microphone.
Clear Browser Cache
- Go to
Settings > Privacy and Security > Clear Browsing Data. - In the "Clear browsing data" window, select the "Cached images and files" checkbox.
- Click "Clear data" to clear the browser cache.
Restart Browser and System
- Restart Chrome and, if necessary, your computer to ensure all settings are properly applied.
Test with Another Browser
- Although only Chrome is supported, you can check the settings in other browsers to ensure they are not interfering.
Disable Extensions
- Disable any Chrome extensions that might be interfering with microphone access.
Update Browser and OS
- Make sure your Chrome browser and your operating system (macOS or Windows) are up to date to ensure compatibility and security.
Audio or Video Issues
- Check that your microphone and camera are properly connected and selected in Chrome settings.
- Ensure you've granted necessary permissions to NuIQ in Chrome.
- Restart your browser or computer if issues persist.
Connection Problems
- Test your internet speed and stability.
- Close unnecessary applications and browser tabs.
- Consider using a wired internet connection instead of Wi-Fi.
For more detailed assistance, reach out to NuIQ Support.